Introduction
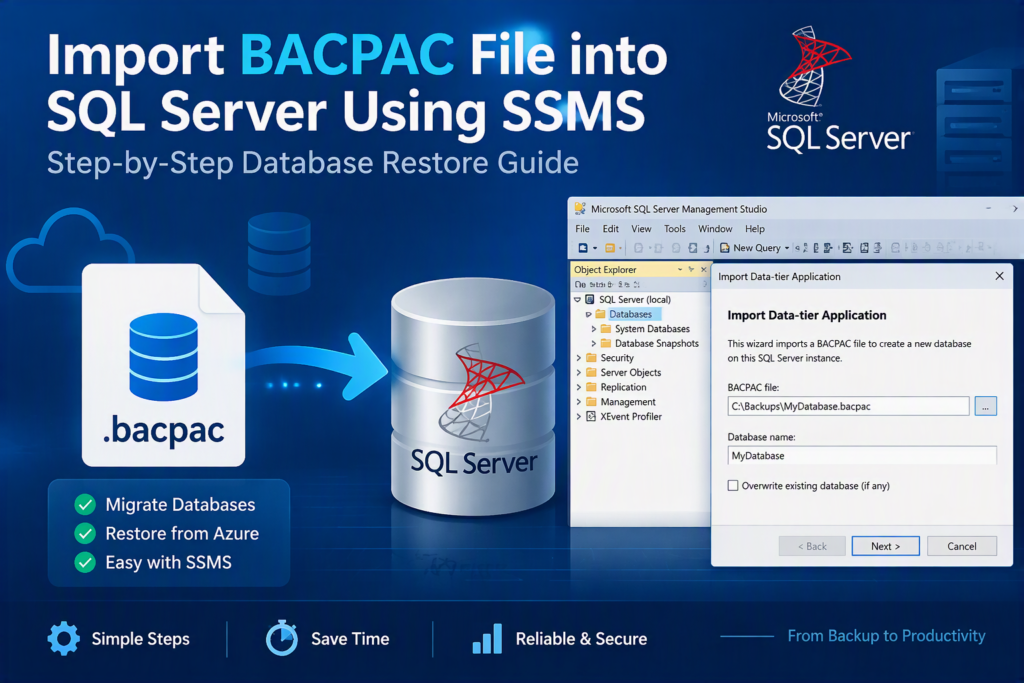
A BACPAC file is a portable package that contains a SQL Server database’s schema and data. It is commonly used to transfer database content between environments, migrate databases, and create portable database copies for development, testing, and other supported scenarios.
In Microsoft Dynamics 365 Business Central, a BACPAC file may be used when working with database exports from a Business Central online (SaaS) environment. However, importing a BACPAC into an on-premises SQL Server is a database-level operation and does not automatically create a fully operational Business Central on-premises environment.
In this step-by-step guide, you will learn how to import a BACPAC file into an on-premises SQL Server using SQL Server Management Studio (SSMS). The tutorial covers connecting to SQL Server, selecting the BACPAC file, configuring the destination database, monitoring the import process, verifying the results, and troubleshooting common errors.
Whether you are preparing a database for development, testing, or a supported Business Central migration scenario, these instructions will help you understand the SQL Server BACPAC import process.
Prerequisites
Before importing a BACPAC file into SQL Server, make sure the following requirements are satisfied.
| Requirement | Description |
|---|---|
|
BACPAC file |
The .bacpac file containing the database schema and data. |
|
SQL Server |
An installed and running on-premises SQL Server instance. |
|
SQL Server Management Studio (SSMS) |
A compatible SSMS version with the Import Data-tier Application wizard. |
|
SQL Server permissions |
Sufficient permissions to create the destination database and perform the import. |
|
Disk space |
Adequate free disk space for database files and temporary import operations. |
|
Database compatibility |
The target SQL Server version must support the schema and database features contained in the BACPAC file. |
|
File access |
Access to the local BACPAC file or the Azure Storage location containing it. |
Important consideration for Business Central SaaS databases
If you are importing a BACPAC exported from Microsoft Dynamics 365 Business Central SaaS, verify that the export is supported for your intended scenario and that the target SQL Server and Business Central versions are compatible.
A successful SQL Server import does not guarantee that the database can be used directly by an on-premises Business Central installation. Additional compatibility checks, application configuration, and supported migration procedures may be required.
For the preceding step, see our guide: How to Export a Business Central SaaS Database.
Open SQL Server Management Studio (SSMS)
The first step is to connect to your on-premises SQL Server instance using SQL Server Management Studio.
Follow these instructions:
-
Open SQL Server Management Studio (SSMS) on your computer.
-
In the Connect to Server window, select Database Engine as the server type.
-
Enter the SQL Server instance name. For example:
-
localhost -
SERVERNAME -
SERVERNAME\INSTANCE
-
-
Select the appropriate authentication method, such as Windows Authentication or SQL Server Authentication, depending on your configuration.
-
Enter the required credentials if prompted.
-
Click Connect.
For example, if your SQL Server instance is named ADMIN\SQL2022, enter that instance name in the Server name field.
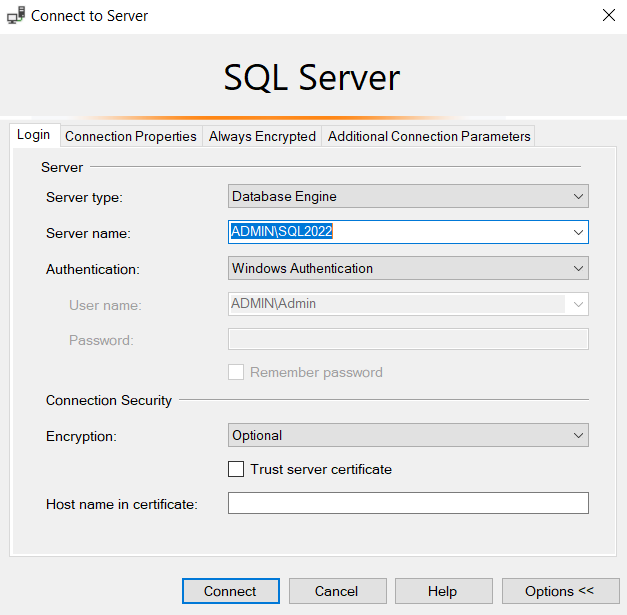
After connecting successfully, your SQL Server instance will appear in Object Explorer. You can now manage databases and perform the BACPAC import.
Start the Import Data-tier Application Wizard
SQL Server Management Studio provides an Import Data-tier Application wizard for importing a BACPAC file into a new SQL Server database.
To open the wizard:
-
In Object Explorer, expand your SQL Server instance.
-
Locate the Databases folder.
-
Right-click Databases.
-
Select Import Data-tier Application from the context menu.
-
Review the introduction page in the wizard.
-
Click Next to continue.
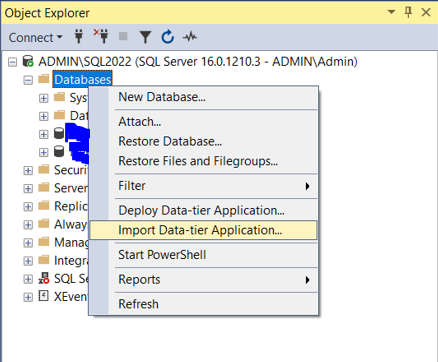
The wizard guides you through selecting the BACPAC file, configuring the destination database, reviewing the import settings, and executing the import operation.
Select the BACPAC File
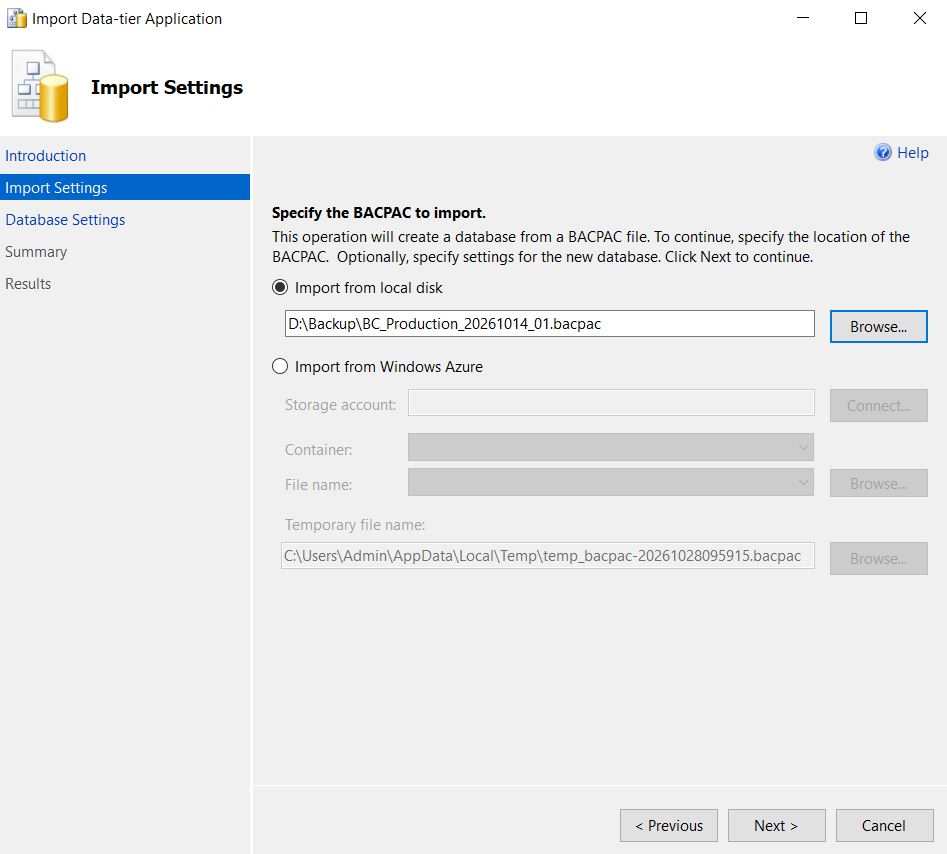
In the Import Settings page, specify the location of the BACPAC file you want to import.
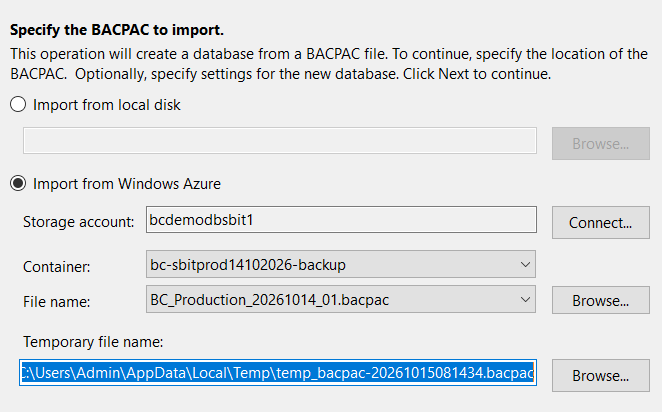
Depending on your SSMS version and the available import options, you may be able to import directly from Azure Storage or select a BACPAC file stored locally.
Option A: Import a BACPAC File from Azure Blob Storage
If your BACPAC file is stored in Azure Blob Storage and your wizard supports direct Azure Storage access, follow these steps:
-
Select the option to import from Windows Azure or Azure Storage, if available.
-
Click Connect to configure access to Azure Storage.
-
Authenticate using the supported method.
-
Select the appropriate Azure subscription, if prompted.
-
Select the Storage Account containing the BACPAC file.
-
Select the Blob Container where the file is stored.
-
Choose the required
.bacpacfile. -
Confirm your selection and click Next.
Option B: Import a BACPAC File from Your Local Computer
If the BACPAC file is already stored on your computer or a network location accessible to SSMS, use the local file option.
-
Select Import from local disk or the equivalent local-file option displayed by your wizard.
-
Click Browse.
-
Navigate to the folder containing the
.bacpacfile. -
Select the required file.
-
Confirm the file selection.
-
Click Next to continue.
Ensure that the file is accessible and has been downloaded completely before starting the import.
Important:
A BACPAC import is not the same as restoring a SQL Server .bak backup. Use the import wizard for BACPAC packages rather than the Restore Database wizard.
Configure the Destination Database Settings
After selecting the BACPAC file, the wizard displays the Database Settings page.
Here, you specify the name of the new database and the locations where SQL Server will store the database files.
Configure the following settings:
| Setting | Example | Description |
|---|---|---|
|
New database name |
BC_Production_20261014_01 |
The name of the destination database to create. |
|
Data file path |
D:\Database |
The directory where the database data file will be stored. |
|
Log file path |
D:\Database |
The directory where the transaction log file will be stored. |
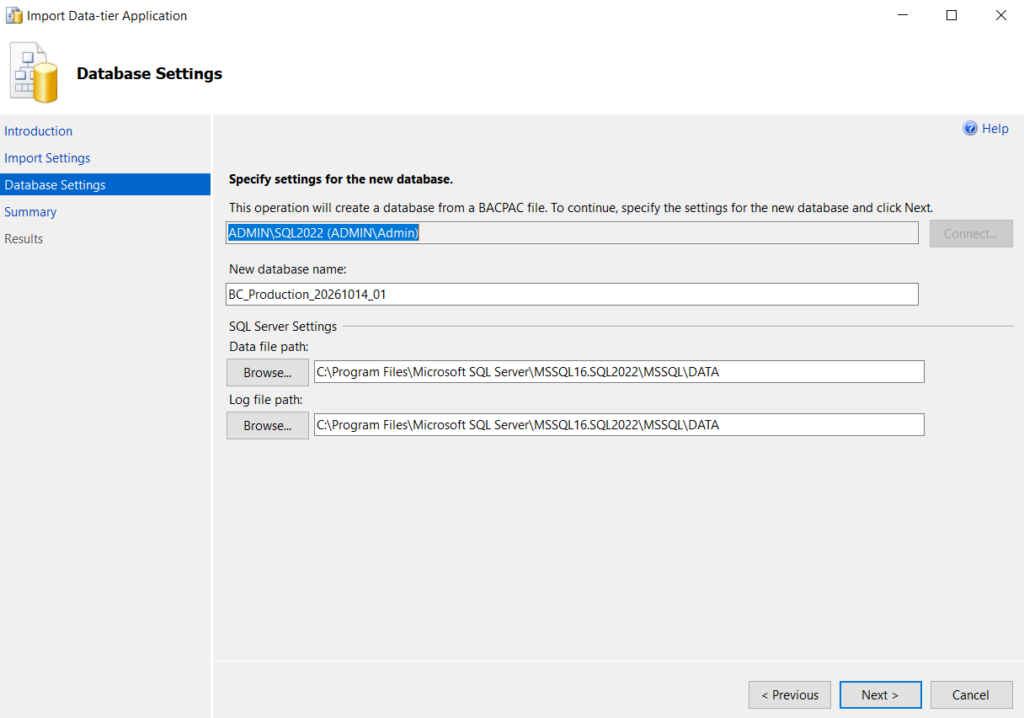
Choose a meaningful database name that identifies the source environment, purpose, or import date. For example, you could use a name such as BC_Sandbox_Import.
When configuring the file locations, consider the following:
-
Ensure that the selected disk has sufficient free space.
-
Confirm that the SQL Server service account has the required access to the directories.
-
Use appropriate storage locations for database data and transaction log files.
-
Avoid selecting a database name that is already in use unless you have reviewed and approved the replacement procedure.
Important:
The wizard creates a destination database. Do not delete or overwrite an existing production database without a verified backup and an approved recovery plan.
Review the Import Configuration
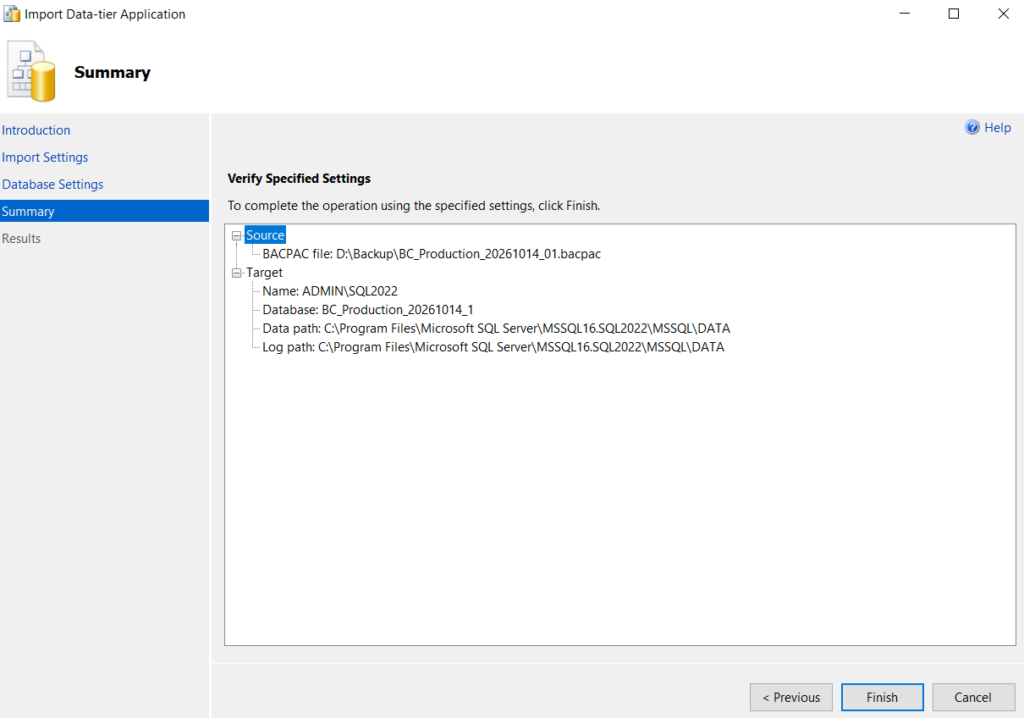
Before executing the BACPAC import, review the configuration displayed by the wizard.
Depending on your SSMS version, the wizard may display a summary of the selected package, destination database, and import settings.
Check the following details:
-
Confirm that you selected the correct BACPAC file.
-
Verify the destination database name.
-
Review the configured data and transaction log file locations.
-
Confirm that sufficient disk space is available.
-
Check for any warnings or compatibility issues reported by the wizard.
If any settings are incorrect, return to the relevant page and update them before continuing.
Once you have reviewed the configuration, proceed to the final page and click Finish to start the import.
Monitor the BACPAC Import Progress
After clicking Finish, SQL Server Management Studio begins importing the BACPAC file into the destination database.
The import process generally involves creating the database objects defined in the package and loading the associated data into the tables.
The time required depends on several factors, including:
-
The size of the BACPAC file.
-
The amount of data being imported.
-
The number and complexity of database objects.
-
Available CPU, memory, and disk performance.
-
SQL Server configuration and resource availability.
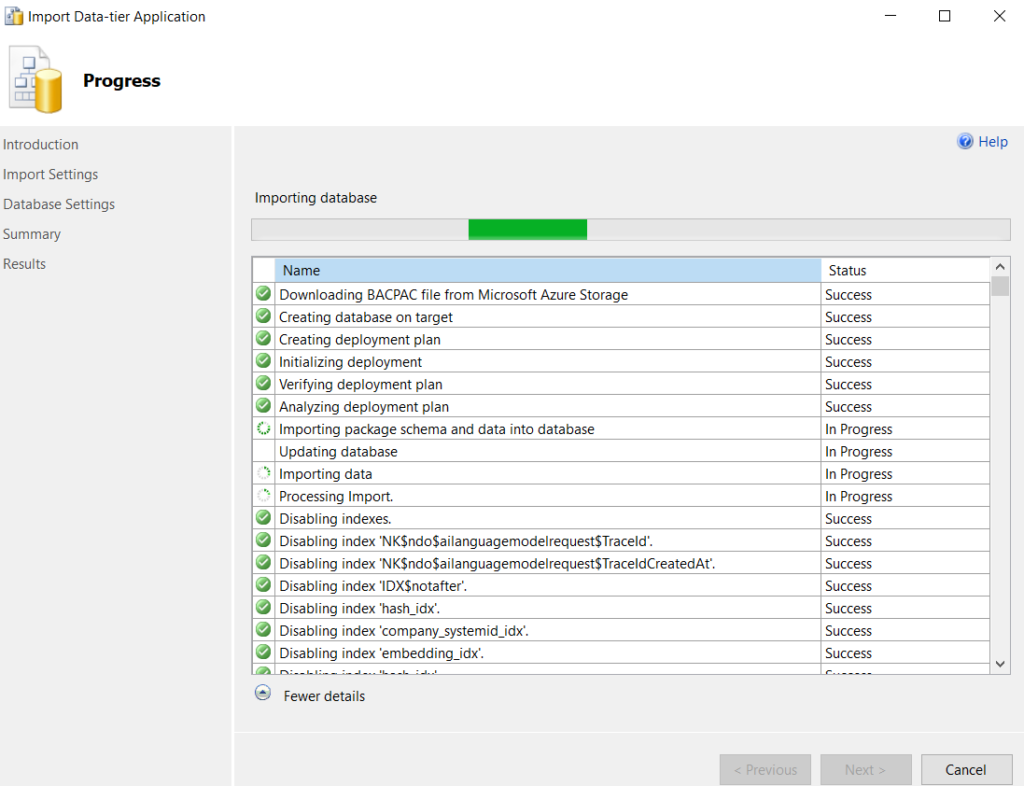
During the import process:
-
Keep SSMS open until the operation completes.
-
Monitor the progress and status messages displayed by the wizard.
-
Review any warnings or errors.
-
Avoid interrupting the operation unless necessary.
-
If the import fails, record the detailed error message before retrying.
If the operation fails, identify the failing step and resolve the underlying issue before attempting the import again.
Verify the Imported SQL Server Database
After the import completes, the wizard displays the results of the operation.
A successful import indicates that the package was imported into SQL Server. However, you should perform additional checks to confirm that the database is accessible and that the expected objects are present.
1 Review the Import Results
Follow these steps:
-
Review the Results page in the Import Data-tier Application wizard.
-
Confirm that the import completed successfully.
-
Check for any warnings or errors.
-
Click Close.
-
Return to Object Explorer.
-
Expand the Databases folder.
-
Locate the newly created database.
-
Expand Tables to inspect the available database objects.
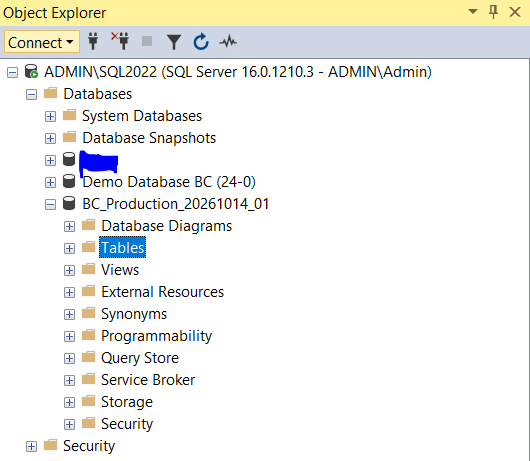
2 Verify Database Connectivity Using a SQL Query
You can execute a simple SQL query to confirm that the imported database is accessible.
Open a new query window in SSMS, select the appropriate database or execute the following query:
					USE [BC_Production_20261014_01];
GO

SELECT
    DB_NAME() AS DatabaseName,
    GETDATE() AS VerificationTime;
GO
Replace BC_Production_20261014_01 with your actual destination database name.
If the query executes successfully and returns the expected database name, SQL Server can access the database under your current connection.
3 Check the Database State and Compatibility Level
You can also query the SQL Server system catalog to check the database state and compatibility level.
					SELECT name, state_desc, ompatibility_level
FROM sys.databases
WHERE name = N'BC_Production_20261014_01';
For a database that is ready for normal SQL access, the state should generally be ONLINE.
The compatibility level indicates the SQL Server database compatibility setting. It does not, by itself, establish that the database is compatible with a particular Business Central application version.
For Business Central databases, additional validation is required before connecting the database to a Business Central Server instance.
Common BACPAC Import Errors and Troubleshooting
During the SQL Server BACPAC import process, you may encounter errors related to permissions, disk space, database compatibility, or the package itself.
The following table summarizes common issues and recommended troubleshooting steps.
| Issue | Possible cause | Recommended action |
|---|---|---|
|
Import Data-tier Application option is missing |
Incorrect Object Explorer selection, SSMS version, or unavailable wizard functionality |
Verify the selected SQL Server instance, right-click the Databases folder, and check your SSMS version. |
|
Access denied |
Insufficient SQL Server permissions or file-system access |
Verify the required database creation permissions and access to the relevant file locations. |
|
Insufficient disk space |
Not enough storage for database files or temporary import operations |
Free up disk space or select suitable data and log file locations. |
|
Database already exists |
The destination database name is already in use |
Select a different database name or follow an approved database replacement procedure. |
|
Unsupported database object |
The package contains schema features unsupported by the target SQL Server version |
Review the detailed error message and check source and target compatibility. |
|
Import fails during data loading |
Data-related errors, resource constraints, or package issues |
Review the Results report, identify the failing operation, and resolve the reported cause. |
|
Azure Storage file cannot be accessed |
Authentication issues, storage permissions, or an unavailable import option |
Verify access to the Storage Account and Blob Container, or download the BACPAC and use the local-file option. |
Troubleshooting tip:
Always capture the complete error message from the import wizard. The detailed error often identifies the specific database object, permission, or operation responsible for the failure.
Additional Considerations for Business Central SaaS Database Imports
If you are importing a BACPAC exported from Microsoft Dynamics 365 Business Central online (SaaS), completing the SQL Server import is only one part of the overall process.
Before attempting to use the database with an on-premises Business Central installation, review the following considerations.
1. Business Central Version Compatibility
Confirm that the exported database is supported for your intended on-premises Business Central version and migration scenario.
Do not assume that a database exported from a Business Central SaaS environment can be attached to any on-premises Business Central version simply because the SQL import succeeded.
2. Business Central Server Configuration
Importing a BACPAC creates a SQL Server database from the package. It does not automatically install, configure, or connect a Business Central Server instance to that database.
The appropriate application setup and database configuration must be completed separately using a supported procedure.
3. Extensions and Customizations
Review the application extensions, dependencies, and customizations relevant to your intended environment.
Confirm that the necessary application components are available and compatible with the target Business Central version.
4. SQL Server Security and Permissions
Review the SQL Server logins, database users, permissions, and service-account access required by your target environment.
A successful import does not guarantee that the existing security configuration is suitable for the destination server.
5. Post-Import Validation
Before using the database for development, testing, or production-related activities, validate the database using the supported procedure for your specific scenario.
Test application connectivity and relevant functionality in an appropriate non-production environment before considering any production use.
6. Understand the Difference Between BACPAC and BAK Files
A BACPAC file and a native SQL Server backup serve different purposes.
-
BACPAC (
.bacpac): A portable package containing database schema and data that can be imported to create a database. -
SQL Server backup (
.bak): A native SQL Server backup used with SQL Server’s database restoration process.
A BACPAC import is not equivalent to restoring a native SQL Server backup. It should not be treated as a conventional backup-and-restore mechanism for creating a fully operational on-premises Business Central environment.
Use the export, migration, and restoration procedures supported for the specific Business Central version and deployment scenario.
Conclusion
Importing a BACPAC file into an on-premises SQL Server using SQL Server Management Studio is a practical way to create a database from a package containing schema and data.
By following this guide, you have learned how to connect to SQL Server, open the Import Data-tier Application wizard, select a BACPAC file from Azure Storage or a local location, configure the destination database, monitor the import, and verify the results.
For Microsoft Dynamics 365 Business Central SaaS databases, remember that a successful SQL Server import is not the same as a completed migration to Business Central on-premises. Version compatibility, application configuration, extensions, security, and post-import validation must also be addressed according to the supported migration procedure.
Following these steps will help you perform a more reliable BACPAC import and troubleshoot common SQL Server database import issues.
For more Microsoft Dynamics 365 Business Central technical tutorials, database guides, and development resources, explore MSDNKR.com-Technical & Functional Insights for Dynamics 365.