Introduction
Microsoft Dynamics 365 Business Central Online (SaaS) is a cloud-based ERP solution that helps organizations manage financials, sales, purchasing, inventory, manufacturing, and other business operations.
In certain situations, administrators and developers may need to export a copy of a Business Central production database for troubleshooting, data analysis, development, migration preparation, or other technical activities.
Microsoft Dynamics 365 Business Central provides a database export feature in the Business Central Administration Center that allows authorized administrators to export an online environment database as a .bacpac file to an Azure Storage account.
In this step-by-step guide, you will learn how to export a Business Central Online production database to Azure Blob Storage, configure a Shared Access Signature (SAS), monitor the export operation, and understand how to use the exported BACPAC file.
Important: Business Central Online does not provide a direct download of a standard SQL Server .bak backup through SQL Server Management Studio (SSMS). The supported database export process generates a .bacpac file, which can be imported into a compatible SQL database for supported analysis and development scenarios.
Prerequisites
Before exporting a Microsoft Dynamics 365 Business Central SaaS database, ensure that you have the following:
-
Access to the Business Central Administration Center.
-
An authorized internal or delegated administrator account.
-
The required Microsoft Entra role and the
D365 BACKUP/RESTOREpermission set assigned to the relevant Business Central user account. -
An active Azure subscription with permission to create and manage storage resources.
-
An Azure Storage Account using Standard, General-purpose v2 (GPv2) storage.
-
An Azure Blob Storage container, or permission to create one.
-
A valid Blob service SAS URI with the required permissions.
Export limit:
Each environment can be exported a maximum of 10 times per calendar month. You can check the remaining export allowance in the Create Database Export pane.
For additional technical details, refer to Microsoft’s official documentation: Exporting Databases in the Admin Center.
Open the Business Central Administration Center
The first step is to open the Business Central Administration Center and identify the production environment whose database you want to export.
-
Open the Business Central Administration Center.
-
Sign in using an authorized administrator account.
-
Navigate to the Environments page.
-
Locate the required production environment.
-
Select the environment name to open its details.
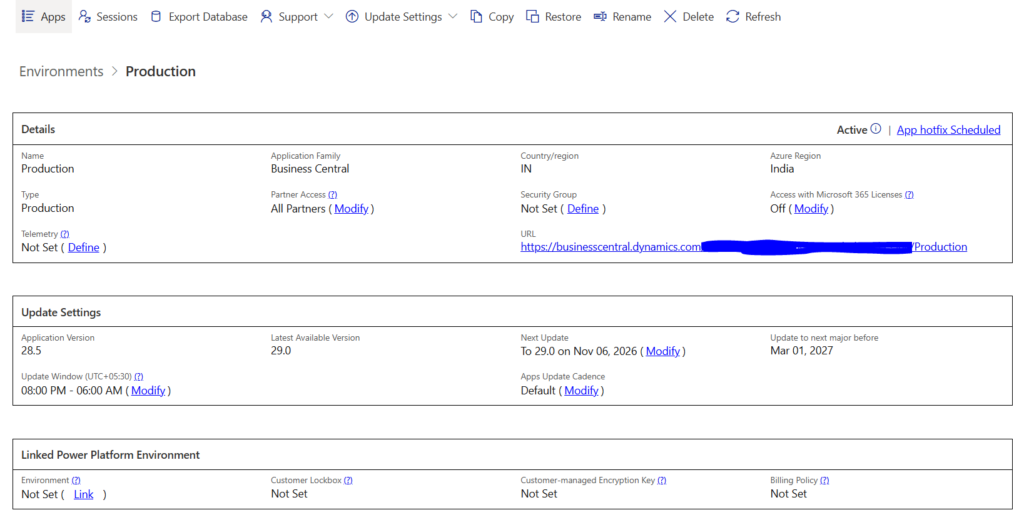
Before proceeding, verify the environment name, application version, and environment type. This is particularly important when your tenant contains multiple production and sandbox environments.
Create an Azure Storage Account
The exported Business Central database is stored as a BACPAC file in Azure Blob Storage. You must prepare an appropriate Azure Storage Account before starting the export.
If you already have a compatible storage account, you can skip the creation process and proceed to generate the SAS URI.
Otherwise, follow this guide: Create an Azure Storage Account in Microsoft Azure
Ensure that the storage account meets the following requirements:
-
Performance and account type: Standard, General-purpose v2 (GPv2).
-
Storage service: Azure Blob Storage.
-
Container: An existing container or a name for a new container.
-
Access security: Use a time-limited SAS URI rather than exposing storage account keys unnecessarily.
Microsoft does not support this database export process with Premium or unsupported storage account types.
Generate a Shared Access Signature (SAS) URI
A Shared Access Signature (SAS) provides delegated access to Azure Storage resources. Business Central uses the SAS URI to write the exported BACPAC file to the specified storage container.
Follow these steps to generate the SAS:
-
Open the Azure portal.
-
Navigate to your Storage Account.
-
Under Security + networking, select Shared access signature.
-
Configure the required SAS settings as described below table.
-
Configure the SAS start date and time and set an appropriate expiry date and time.
-
Ensure that the SAS remains valid for at least 72 hours from the time the export is initiated.
-
Select Generate SAS and connection string.
-
Copy the Blob service SAS URL for use in the Business Central export process.
| Setting | Required configuration |
|---|---|
|
Allowed services |
Blob only |
|
Allowed resource types |
Container and Object |
|
Allowed permissions |
Read, Write, Delete, Create |
|
Allowed protocols |
HTTPS only |
Security recommendation:
Use the shortest practical validity period that satisfies Microsoft’s 72-hour minimum requirement. Keep the SAS URI confidential because anyone possessing a valid SAS may be able to perform the operations permitted by its token.
Export the Business Central Production Database
After configuring Azure Blob Storage and generating the SAS URI, you can initiate the database export from the Business Central Administration Center.
Follow these steps:
-
Return to the Business Central Administration Center.
-
Open Environments and select your production environment.
-
In the environment details, select Database.
-
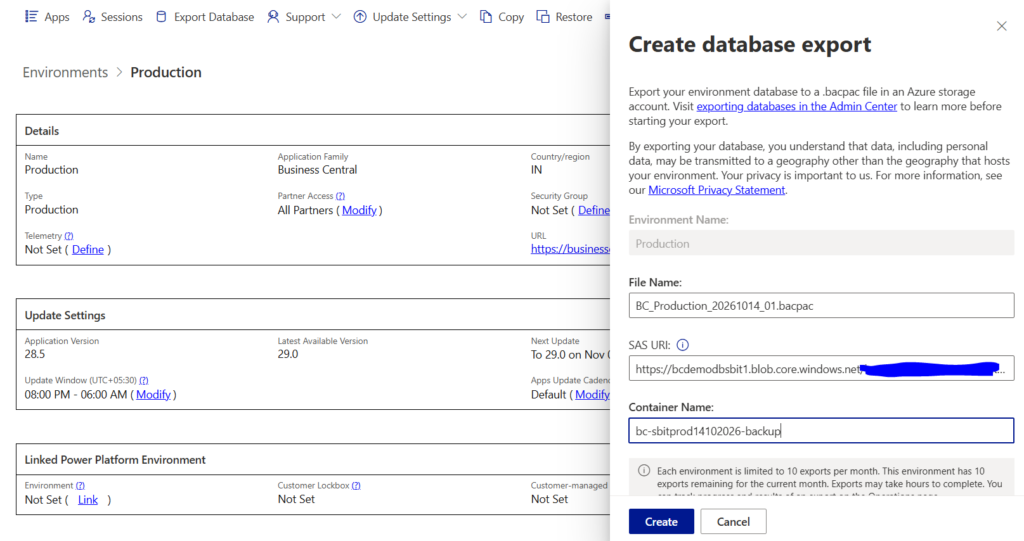
Select Create Database Export.
-
Enter a descriptive file name for the exported database.
Example:
BC_Production_20261028_01.bacpac -
In the SAS URI field, paste the Blob service SAS URL generated in Step 3.
-
In the Container Name field, enter the destination container name.
Example:
bc-production-backups -
Verify the file name, SAS URI, and container name.
-
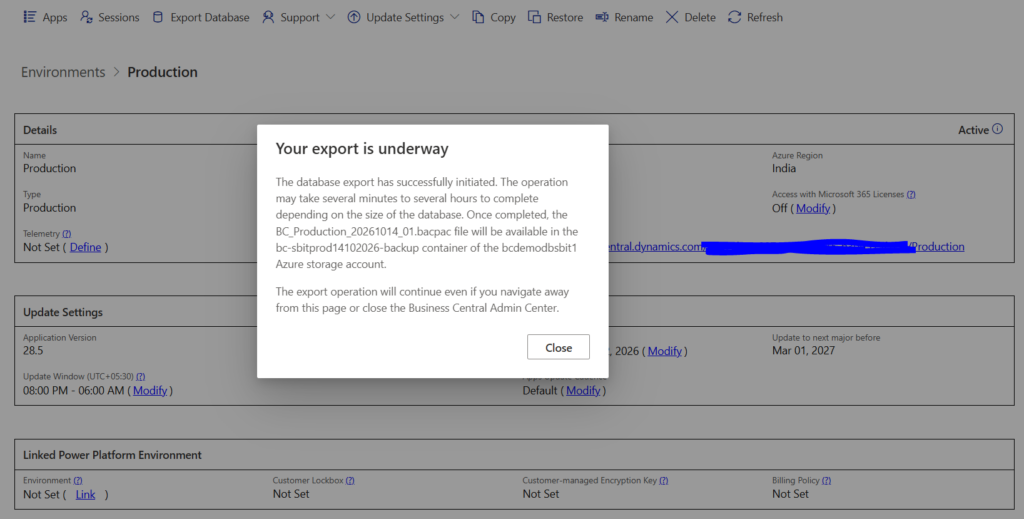
Select Create to initiate the export.
Important considerations during export
-
Confirm that the selected environment is the correct production environment.
-
Ensure that the SAS URI is valid and has the required permissions.
-
Verify that the SAS expiry meets the minimum 72-hour requirement.
-
Check the remaining monthly database export allowance before initiating the operation.
-
Use a clear naming convention that includes the environment and export date.
The export process can take several minutes to several hours, depending on the database size and other processing factors. You can close the Business Central Administration Center browser window while the export continues.
Once the operation completes successfully, the .bacpac file will be available in the specified Azure Blob Storage container.
Verify the Exported BACPAC File in Azure Blob Storage
After initiating the export, verify that the BACPAC file has been generated successfully.
-
Open the Azure portal.
-
Navigate to your Storage Account.
-
Open Data storage → Containers.
-
Select the container specified during the database export.
-
Locate the exported
.bacpacfile. -
Verify the file name and confirm that the export operation completed successfully in the Business Central Administration Center.
For example, the exported file might be named: BC_Production_20261028_01.bacpac
The file name and container shown here are examples. Your actual values depend on the configuration used during export.
Best practice:
Restrict access to the exported database file and follow your organization’s data retention and security policies. A production database export may contain confidential customer, financial, vendor, and other business information.
View the Database Export History
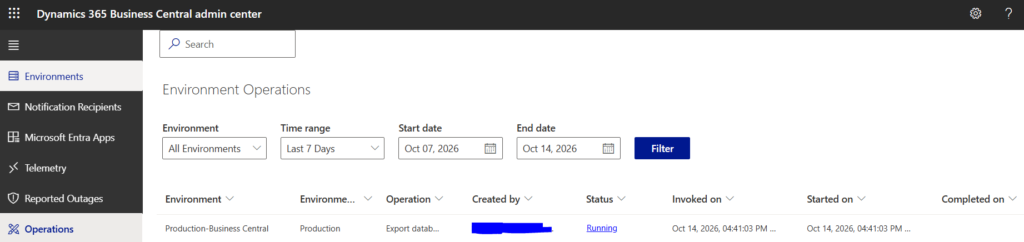
Business Central records database export activity as environment operations. Administrators can use this history to monitor export progress and review the outcome of previous operations.
To view the export history:
-
Open the Business Central Administration Center.
-
Navigate to the relevant environment.
-
Open the Operations page.
-
Locate the database export operation.
-
Review its status and available operation details.
Use this page to determine whether the export has completed successfully or whether further investigation is needed.
Which Users Can Export a Business Central Database?
Database export is restricted to authorized administrators. Having access to the Business Central Administration Center alone does not necessarily grant permission to export an environment database.
Eligible internal and delegated administrators must also have the required Microsoft Entra role and the D365 BACKUP/RESTORE permission set assigned to the relevant Business Central user account.
For further details, see Microsoft’s documentation: Assign Permissions to Users and Groups in Business Central
Important: Limitations of the Business Central BACPAC Export
The BACPAC file exported from Microsoft Dynamics 365 Business Central Online contains customer-specific business data. It can be imported into a compatible Azure SQL Database or SQL Server database for supported data analysis, inspection, and development-related activities.
However, a BACPAC file is not the same as a traditional SQL Server .bak backup. Importing the BACPAC file does not automatically create a fully operational Business Central on-premises environment.
Business Central Online uses a multitenant architecture in which customer-specific business data and application components are handled separately. Therefore, additional application components, the appropriate Business Central version, configuration, and migration procedures may be required when preparing an on-premises deployment.
Important:
Microsoft does not support creating a fully functional Business Central on-premises environment simply by importing a BACPAC exported from Business Central Online. If you are planning a migration, follow Microsoft’s supported migration procedures and use the appropriate Business Central installation media for the target version.
For more information, refer to Microsoft’s official documentation: Exporting Databases in the Business Central Administration Center.
Conclusion
Exporting a production database from Microsoft Dynamics 365 Business Central Online is a useful administrative task for supported data analysis, troubleshooting, development, and migration preparation.
By using the Business Central Administration Center and Azure Blob Storage, authorized administrators can generate a .bacpac file without requiring direct access to the underlying SaaS SQL database.
To complete the process successfully, ensure that you use a supported Standard GPv2 storage account, configure the SAS URI correctly, assign the required permissions, and verify the export operation before using the resulting file.
For more Microsoft Dynamics 365 Business Central technical guides, administration tutorials, and development articles, explore MSDNKR.com — Technical & Functional Insights for Dynamics 365.