Introduction
Microsoft Azure provides Azure Blob Storage, a cloud-based object storage service designed to store and manage large amounts of unstructured data, including documents, images, videos, backup files, and application data. It offers scalable storage with configurable security, data protection, and redundancy options.
To use Azure Blob Storage, you first need to create an Azure Storage Account. You can then create a Blob container to organize your files and configure access permissions to control how the data is accessed.
In this guide, you will learn how to create an Azure Storage Account using the Azure Portal, configure the essential storage and security settings, create a private Blob container, and generate a Shared Access Signature (SAS) URL for controlled access.
This tutorial also uses an example of storing a Business Central database export or backup file in Azure Blob Storage.
By the end of this guide, you will understand how to set up Azure Blob Storage and configure the basic settings required to store files securely in Microsoft Azure.
Prerequisites
Before creating an Azure Storage Account, make sure you have the following:
-
Azure subscription: An active Microsoft Azure subscription.
-
Azure Portal access: Permission to sign in to the Microsoft Azure Portal.
-
Required permissions: Appropriate permissions to create a storage account and configure its settings.
-
Azure region: A suitable region selected based on data residency, performance, and workload requirements.
-
Storage requirements: An understanding of the files you intend to store and the required access and retention policies.
Sign in to the Azure Portal
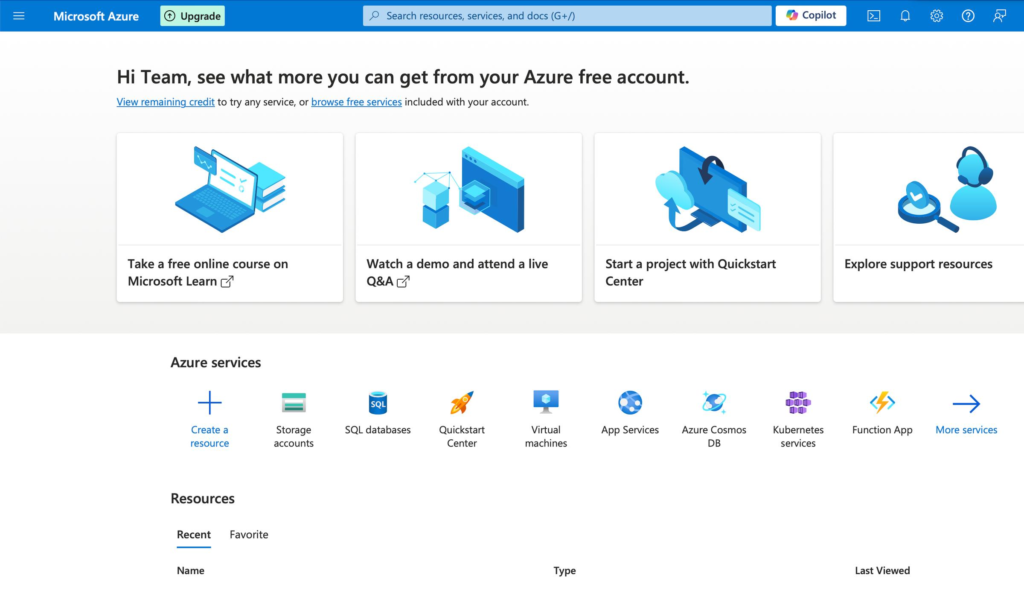
The first step is to sign in to the Microsoft Azure Portal, where you can create and manage Azure resources.
-
Open a web browser.
-
Navigate to https://portal.azure.com.
-
Sign in using your Microsoft account or organizational account.
-
Select the appropriate Azure subscription if you have access to multiple subscriptions.
After signing in, you can search for Azure services and manage resources within your selected subscription.
Screenshot: Azure Portal sign-in
Open Storage Accounts
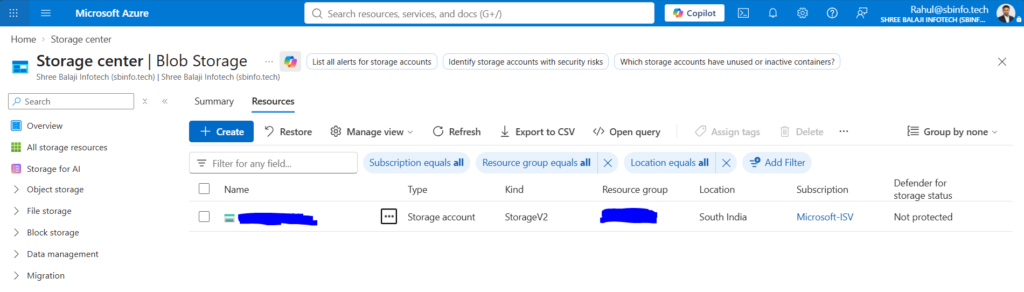
Once you have signed in to the Azure Portal, navigate to the Storage Accounts service.
-
In the Azure Portal search bar, enter Storage accounts.
-
Select Storage accounts from the search results.
-
On the Storage accounts page, click + Create to start creating a new storage account.
Azure will open the storage account creation wizard, where you can configure the subscription, resource group, storage account name, region, performance, and redundancy options.
Screenshot: Open Storage Accounts
Configure the Basics tab
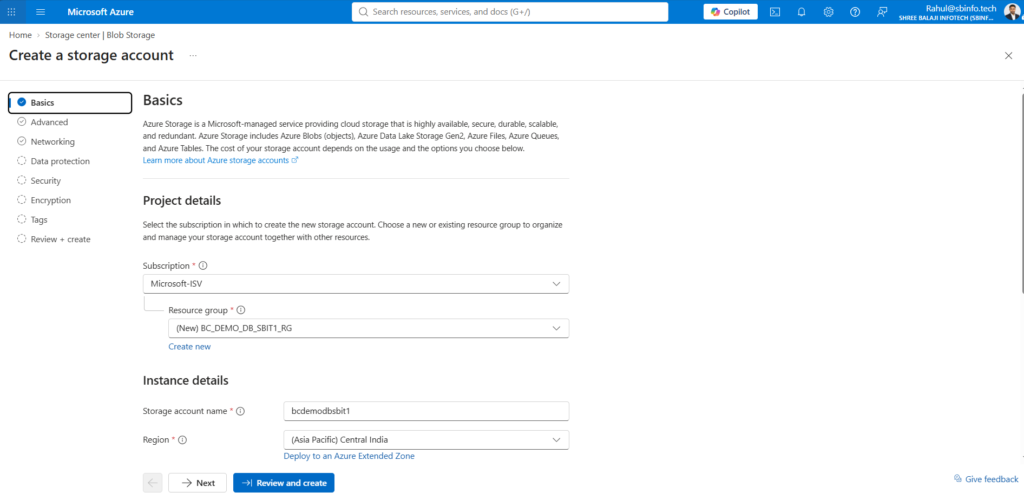
On the Create a storage account page, configure the basic settings required for your workload.
| Setting | Example value | Description |
|---|---|---|
|
Subscription |
Your Azure subscription |
Select the subscription in which the storage account will be created. |
|
Resource group |
BC_DEMO_DB_SBIT1_RG |
Select an existing resource group or create a new one to organize related Azure resources. |
|
Storage account name |
bcdemodbsbit1 |
Enter a globally unique name containing 3–24 lowercase letters and numbers. |
|
Region |
Suitable Azure region |
Select a region based on your workload, compliance requirements, and data residency needs. |
|
Primary service |
Azure Blob Storage |
Use Blob Storage for files, exports, backups, and other unstructured data. |
|
Performance |
Standard |
A practical starting point for many general-purpose storage workloads. |
|
Redundancy |
Locally-redundant storage (LRS) |
Stores multiple copies of data within a single physical location in the primary region. |
Important considerations:
-
Storage account names must be globally unique across Azure.
-
If your preferred name is unavailable, choose another name that meets Azure naming requirements.
-
Standard performance and LRS can be suitable for certain temporary export scenarios, but redundancy should be selected according to your recovery and availability requirements.
-
Azure Data Lake Storage Gen2 is an option when your workload requires its hierarchical namespace capabilities. It is not required for a standard Blob container.
For this example, the storage account will be used to store a database export file.
Screenshot: Configure the Basics tab
Configure Advanced settings
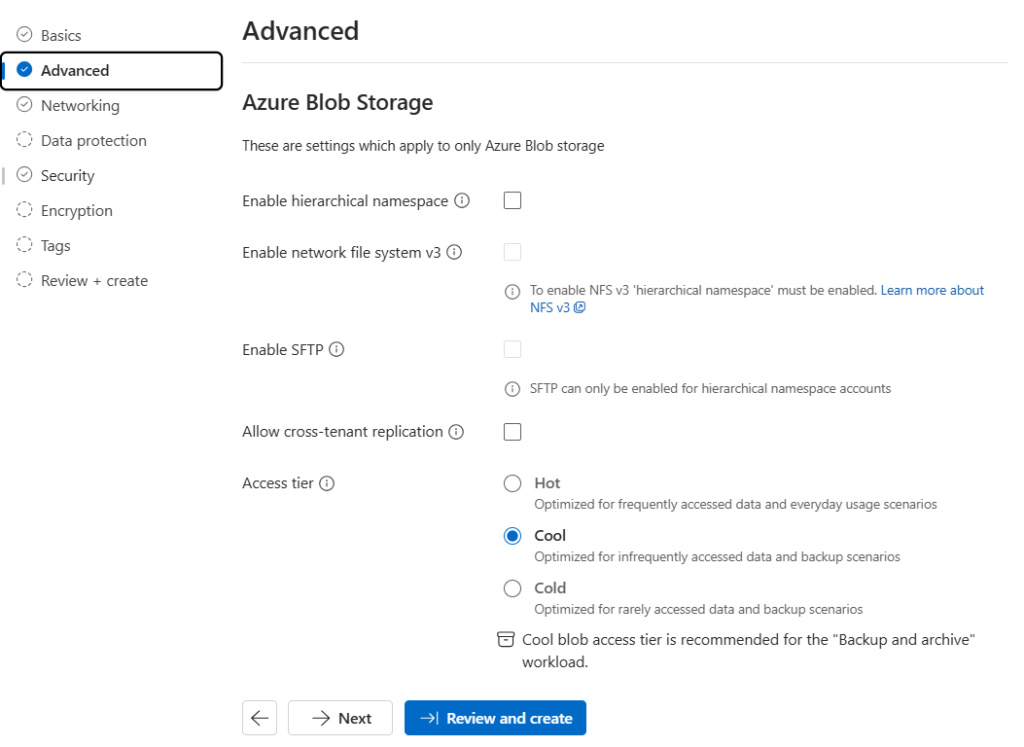
Next, open the Advanced tab to review the additional storage account settings.
For a standard Azure Blob Storage account used to store exported database files, review the following options.
Enable hierarchical namespace: Keep Enable hierarchical namespace disabled unless you specifically require Azure Data Lake Storage Gen2 functionality, such as directory-oriented data management and supported analytics workloads.
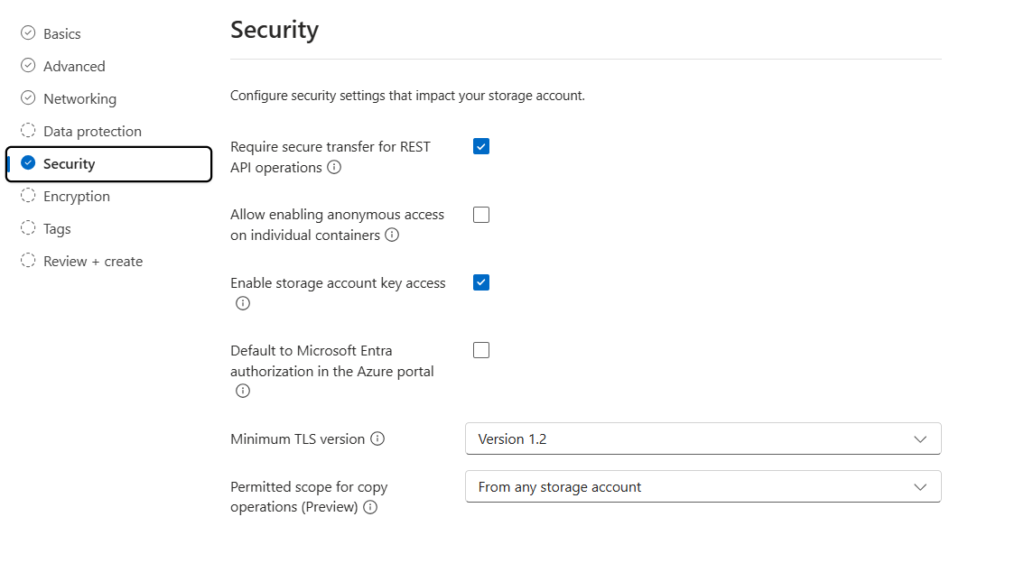
Minimum TLS version: Set the minimum Transport Layer Security (TLS) version to TLS 1.2 or the strongest supported version compatible with your applications and requirements.
TLS helps protect data transmitted between clients and Azure Storage.
Allow Blob anonymous access: Keep anonymous Blob access disabled unless there is a specific, approved requirement for public access.
For database exports and backup files, private access is generally the appropriate choice.
Other advanced settings: Review the remaining options based on your workload, organizational policies, and security requirements. Retain secure defaults where appropriate.
Screenshot: Review Advanced settings
Review Networking settings
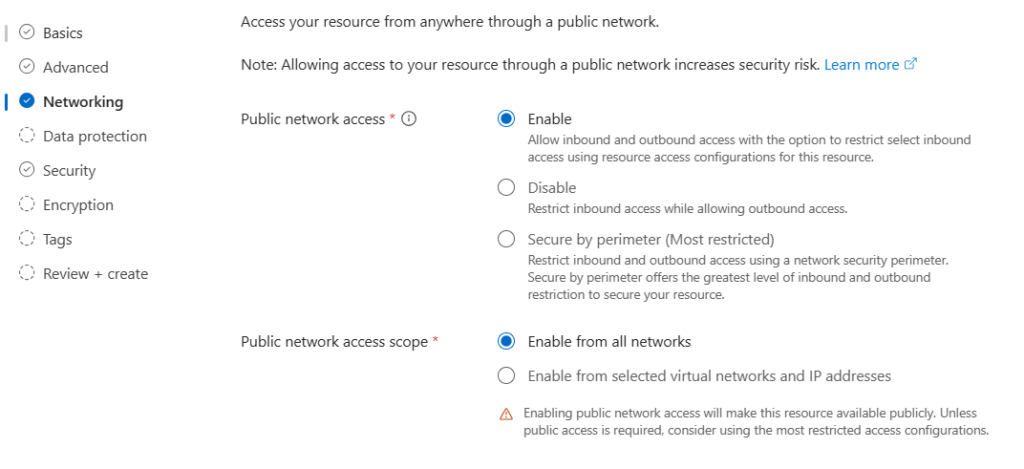
The Networking tab controls how clients and applications can connect to your Azure Storage Account.
Select a configuration that matches your access requirements.
For a basic setup, public network access may be enabled while access to the data remains restricted through authentication and authorization. However, allowing public network access does not mean that Blob data must be publicly accessible.
For production environments, consider the following security measures:
-
Restrict network access to approved virtual networks or IP addresses where appropriate.
-
Use private endpoints when your architecture requires private connectivity.
-
Apply the organization’s network security and access policies.
-
Ensure that data access is authenticated and authorized.
Important: Do not make database export files or backup containers publicly accessible just to simplify downloading. Configure the appropriate network and identity controls instead.
Screenshot: Review Networking settings
Important:
Do not make database export files or backup containers publicly accessible just to simplify downloading. Configure the appropriate network and identity controls instead.
Configure Data Protection settings
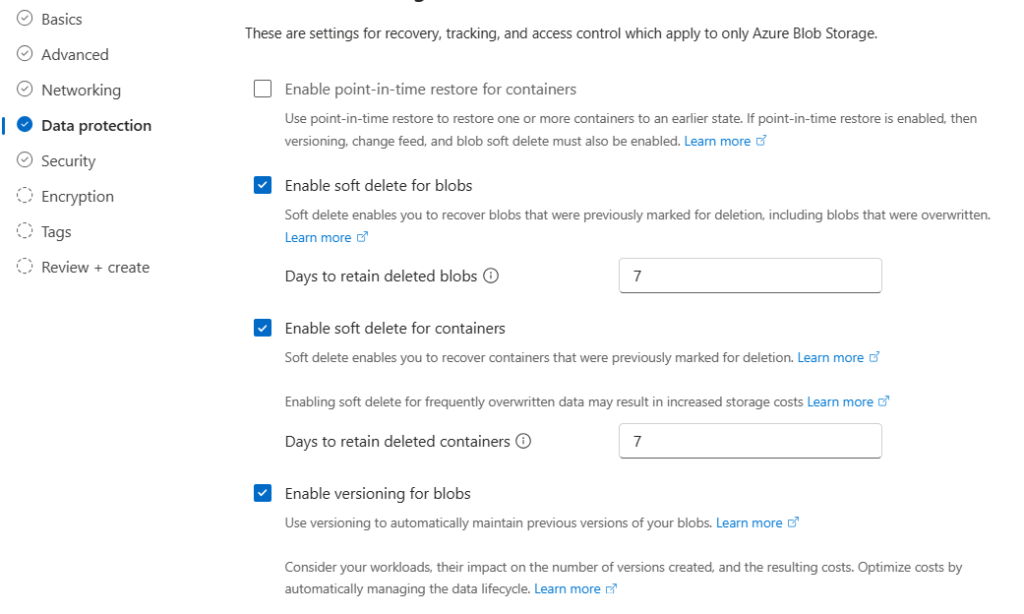
Open the Data protection tab to review the recovery options available for Blob Storage.
Depending on your requirements, consider enabling the following features.
Blob soft delete: Blob soft delete helps recover deleted blobs within a configured retention period.
Container soft delete: Container soft delete helps recover deleted containers and their contents within the configured retention period.
Blob versioning: Blob versioning maintains previous versions of blobs when supported changes occur, helping recover earlier data states.
Select appropriate retention settings: Choose retention periods based on your recovery requirements, operational procedures, and applicable data retention policies.
These features can help protect files against accidental deletion or modification. However, they do not replace a complete backup and disaster recovery strategy.
Also consider the additional storage costs associated with retaining deleted data and previous versions.
Screenshot: Configure Data Protection settings
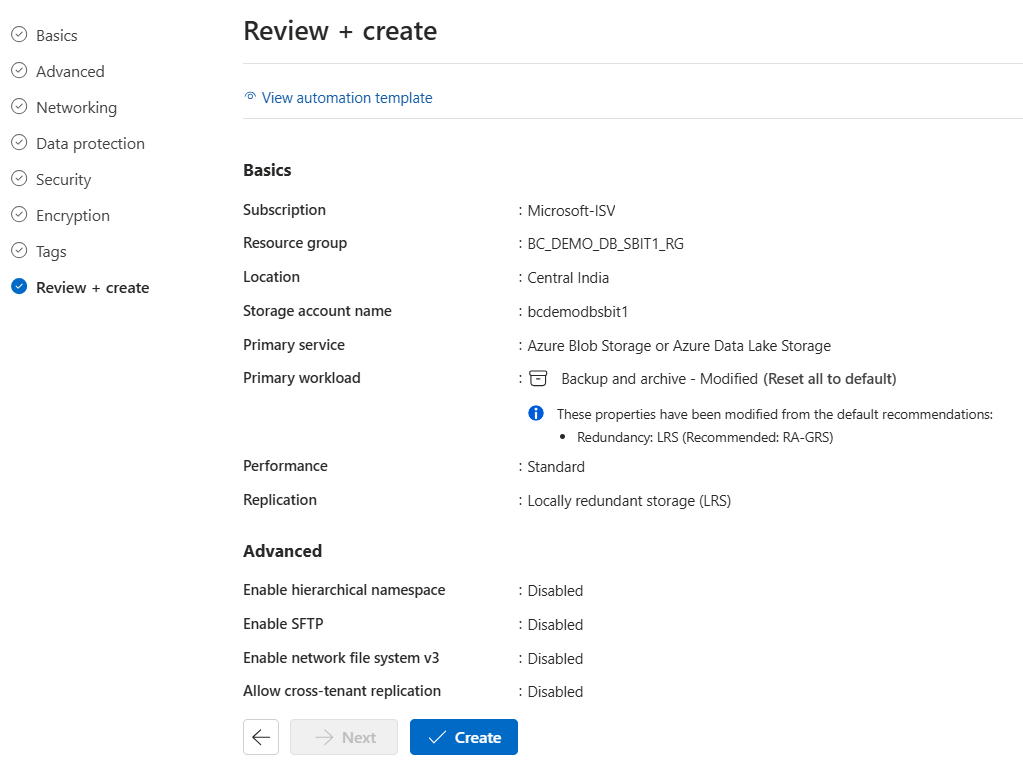
Review and create the Azure Storage Account
After configuring the required settings, review the configuration and create the storage account.
-
Click Review + create.
-
Wait for Azure to validate the configuration.
-
Review the subscription, resource group, storage account name, region, performance, redundancy, and security settings.
-
Correct any validation errors if necessary.
-
Click Create.
-
Wait for the Azure deployment to complete.
Azure will deploy the storage account using the configuration you selected.
Screenshot: Review and create the Storage Account
Open the newly created Storage Account
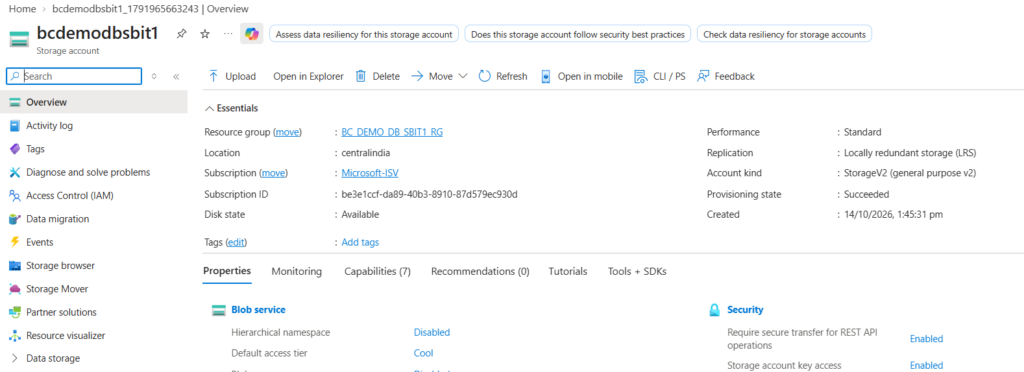
After the deployment finishes, open the newly created resource.
-
Select Go to resource.
-
Verify that the storage account overview page opens.
-
Check the storage account name, resource group, region, and deployment status.
-
Review the available data storage and security settings.
Your Azure Storage Account is now ready for the next step: creating a Blob container.
Screenshot: Storage Account overview
Create an Azure Blob container
An Azure Blob container is used to organize blobs within a storage account. You can think of it as a logical container for files such as database exports, documents, logs, and backup files.
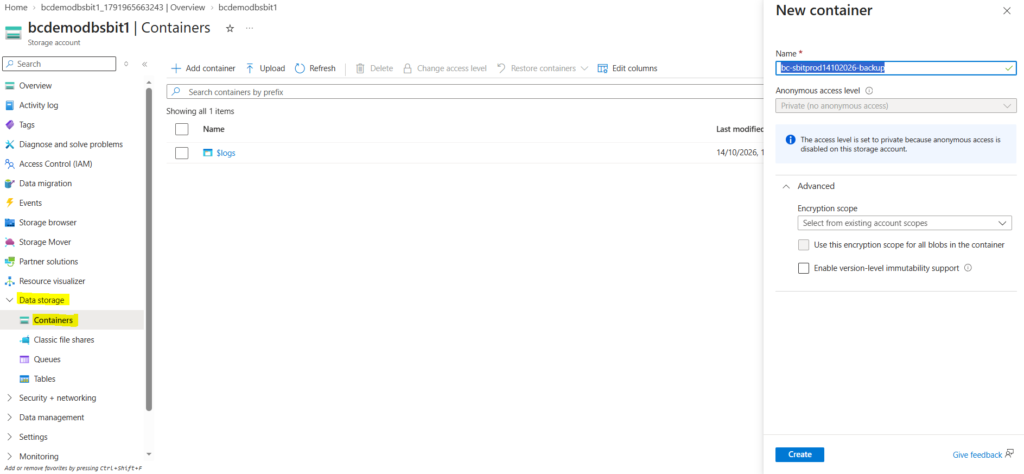
To create a container, follow these steps:
-
Open the newly created Storage Account.
-
Under Data storage, select Containers.
-
Click + Container.
-
Enter a container name, for example,
bc-sbitprod14102026-backup. -
Set the anonymous access level to Private (no anonymous access).
-
Click Create.
The container will appear in the list of containers within your storage account.
You can now use it to organize and manage the files associated with your workload.
Screenshot: Create a Blob container
Security recommendation:
Keep the container private when storing database exports, backups, or other sensitive files. Grant access only to authorized users and applications.
Generate a Shared Access Signature (SAS) URL
A Shared Access Signature (SAS) provides delegated access to Azure Storage resources. Depending on the SAS type and configuration, it can allow a client to perform specific operations for a limited period without receiving the storage account’s full access credentials.
For example, a SAS URL can be used to grant temporary access to a Blob or container for an approved file transfer.
Generate the SAS URL
-
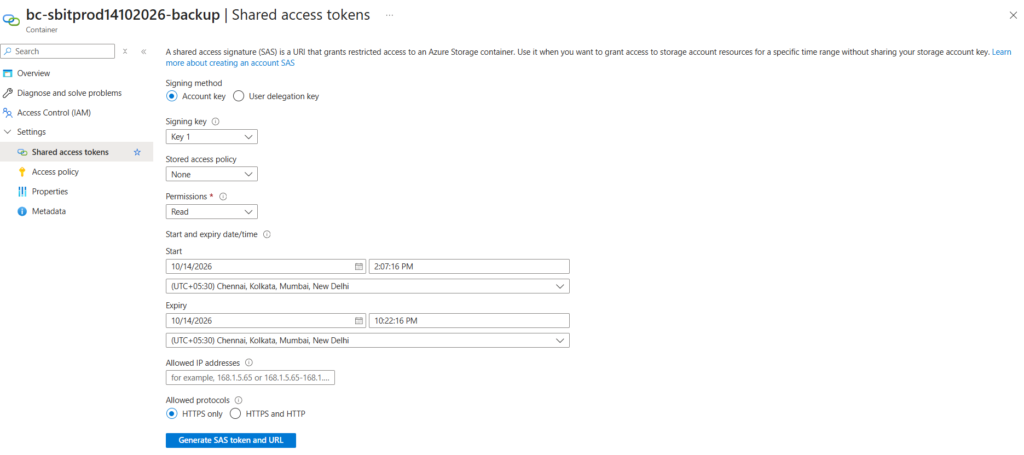
Open the container you created, such as
bc-sbitprod14102026-backup. -
Locate Shared access tokens or the equivalent SAS-generation option available in the Azure Portal.
-
Configure the allowed permissions according to the operation you need to perform.
-
Set an appropriate start time and expiration time.
-
Under Allowed protocols, select HTTPS only, where available.
-
Generate the SAS token or SAS URL.
-
Copy the Blob service SAS URL or the appropriate resource-specific SAS URL, depending on your requirements.
The exact portal labels and available options may vary depending on the resource view and current Azure Portal experience.
Screenshot: Generate a Shared Access Signature
Important SAS security considerations
A SAS URL is a credential that can grant access to the resource within the scope of its permissions. Anyone who obtains the URL may be able to use it until it expires or is otherwise invalidated.
Follow these security practices:
-
Grant only the permissions required for the intended operation.
-
Set a short, appropriate expiration period.
-
Use HTTPS-only access.
-
Avoid including SAS tokens in public screenshots, blog posts, source code, logs, or public repositories.
-
Store SAS URLs securely and share them only with authorized recipients.
-
Prefer Microsoft Entra ID-based authentication and managed identities when supported and appropriate for your application.
-
Understand that revocation options depend on the SAS type and configuration. Do not assume that every SAS can be individually revoked immediately.
Note:
Never publish a real SAS URL in a tutorial. If you capture screenshots for this blog post, hide the SAS token, signature, and any other sensitive credentials before publishing.
Upload files to Azure Blob Storage (Optional)
After creating the Blob container, you can upload files through the Azure Portal.
-
Open the private Blob container.
-
Select Upload.
-
Browse to the file you want to upload.
-
Review the available upload options.
-
Click Upload.
-
Wait for the upload to finish and verify that the file appears in the container.
You can use this process to upload documents, application files, or other supported file types.
For large files or automated transfers, consider tools such as Azure Storage Explorer, Azure CLI, or an appropriate SDK.
Important:
Before uploading a Business Central database export, confirm that the export format, destination, permissions, and intended import or restore process are supported by the relevant Business Central workflow. Do not assume that every database export can be restored directly from an arbitrary Blob container.
Common issues when creating an Azure Storage Account
The following issues may occur during storage account creation or Blob container configuration.
| Issue | Possible solution |
|---|---|
| Storage account name is unavailable | Choose another globally unique name using lowercase letters and numbers. |
| Deployment fails | Review the Azure validation message, permissions, subscription limits, and regional availability. |
| Cannot create a container | Verify your storage data permissions and the applicable authentication method. |
| Cannot access a Blob | Check the container’s access level, identity permissions, SAS permissions, expiration, and network restrictions. |
| SAS URL does not work | Verify the URL, resource scope, allowed permissions, validity period, protocol, and any applicable network restrictions. |
| Upload is blocked | Check the file operation permissions, network configuration, and the tool or application’s supported authentication method. |
Conclusion
Creating an Azure Storage Account and Blob container is a foundational step for storing files and managing unstructured data in Microsoft Azure.
In this tutorial, you learned how to create an Azure Storage Account through the Azure Portal, configure its basic and advanced settings, review networking and data protection options, create a private Blob container, and generate a Shared Access Signature (SAS) URL for controlled access.
Azure Blob Storage can support many use cases, including application data storage, document management, file transfers, and backup workflows. By combining private containers, appropriate identity and access controls, secure network configuration, and suitable data protection settings, you can build a storage solution that aligns with your organization’s requirements.
If you are planning to use Azure Blob Storage for Business Central database exports or other application files, evaluate the required access method, retention policy, and recovery process before using the storage account in a production environment.
Frequently Asked Questions
An Azure Storage Account is a top-level Azure resource that provides access to storage services such as Blob Storage, Azure Files, Queues, and Tables, depending on the account type and supported configuration.
Azure Blob Storage is used to store unstructured data, including documents, images, videos, logs, application files, and backup data.
A Storage Account is the Azure resource that provides the storage service. A Blob container is a logical organization unit within that account used to group blobs.
Container creation settings determine the anonymous access level. For sensitive files, explicitly select private access and configure authorized access through the appropriate identity, permissions, or SAS mechanism.
A SAS URL provides delegated access to a specified Azure Storage resource with defined permissions and validity conditions. It should be protected like a credential.
Yes. Azure Blob Storage can store supported database export and backup files. The appropriate file format, transfer process, security settings, retention policy, and restore procedure depend on the source application.
The appropriate option depends on availability, durability, disaster recovery, regional requirements, and cost. LRS can be suitable for some workloads, but it should not be selected without considering the consequences of a regional or facility-level outage.